
How do I read an auto lock bottom box dieline and set up artwork?
Short answer: An auto lock bottom dieline (ECMA A6020) lays out four vertical body walls in a horizontal row, with a top tuck closure above the front panel and four interlocking lock flaps below the body walls. Keep text 0.125 inches inside score lines and leave the side glue flap and diagonal bottom glue triangles unvarnished on custom auto lock bottom boxes.
On this page
- What are the panels and flaps on an auto lock bottom (ECMA A6020) dieline
- How do the 45-degree diagonal creases and bottom glue triangles work
- What are the cut, fold, bleed, and safe-zone rules on an auto lock dieline
- How do I orient artwork and place the UPC barcode on the dieline
- How do front windows and inside printing appear on the dieline
- How do I get a custom auto lock bottom dieline and 3D proof
- Common mistakes
- FAQs
Request a custom quoteFree dieline & 3D mockup
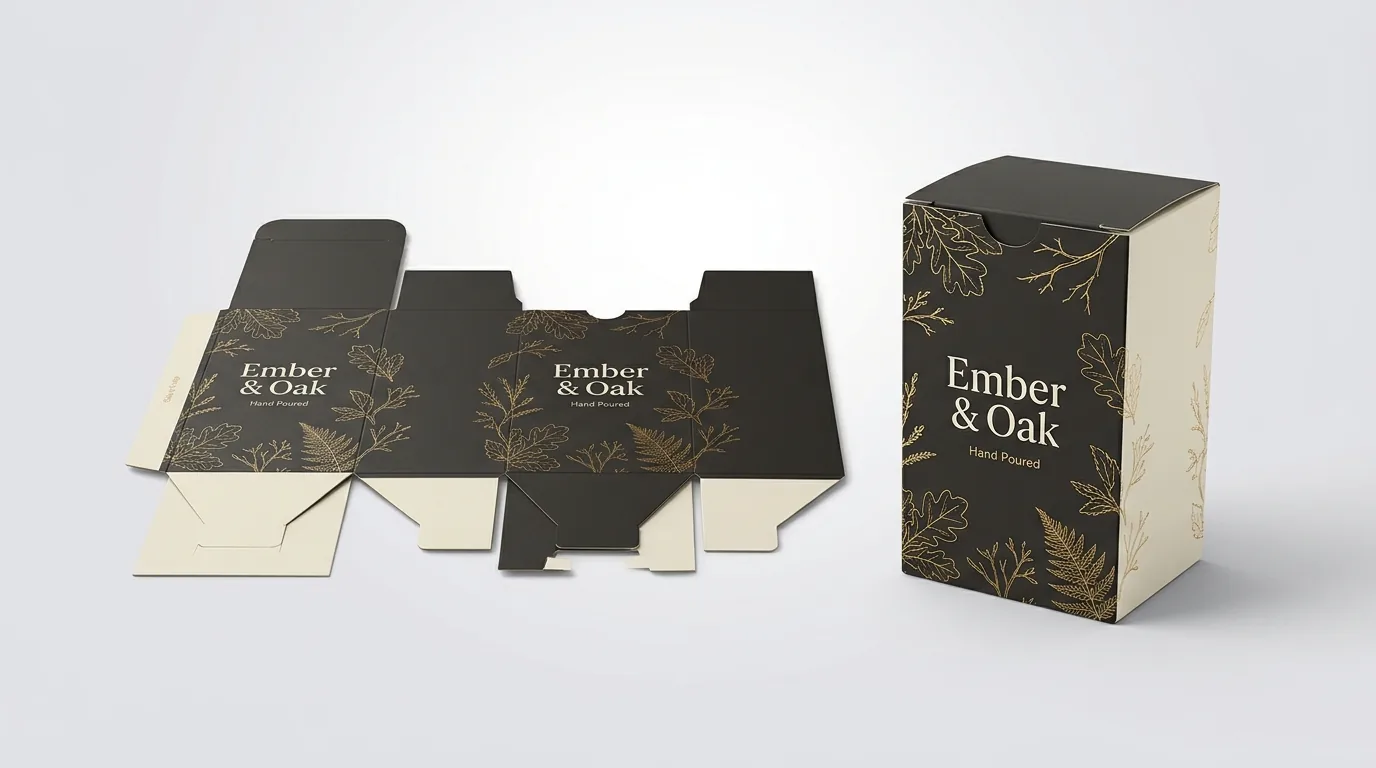
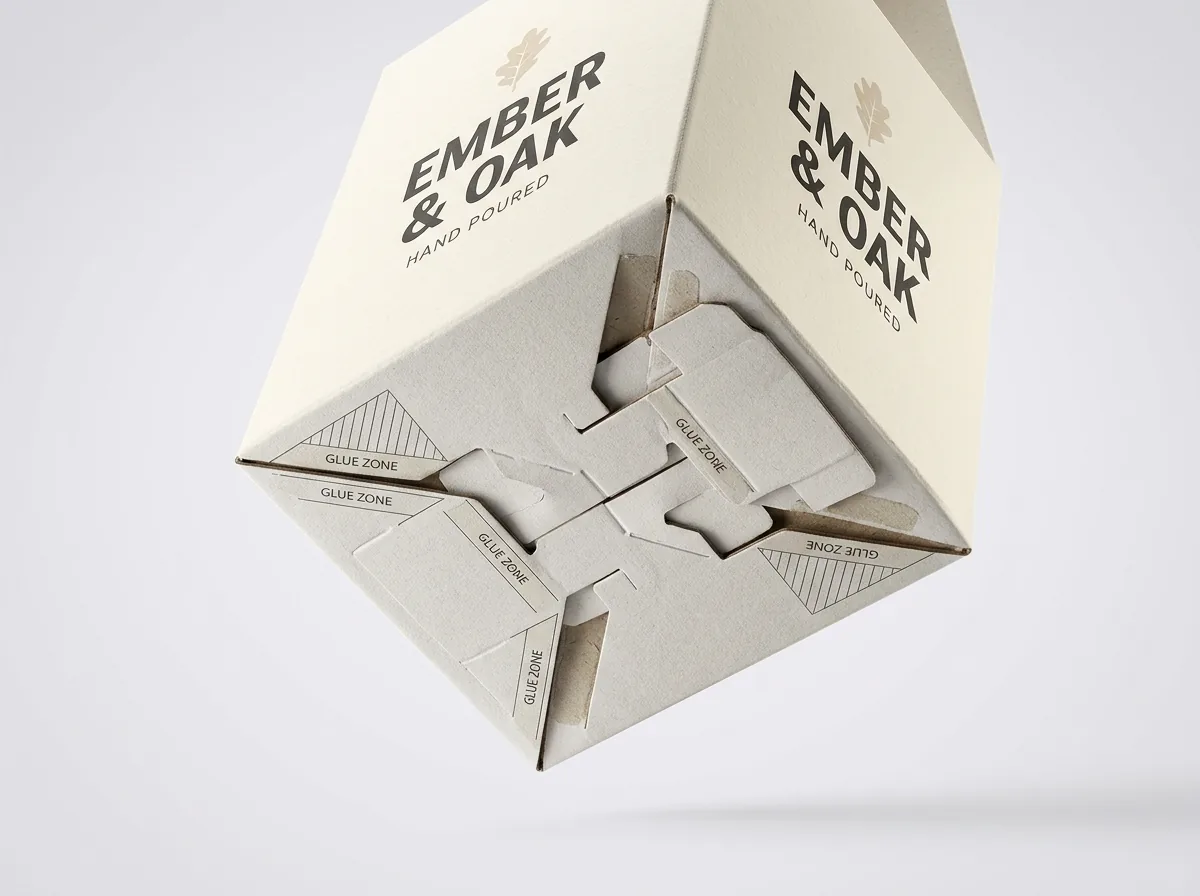
When you open a flat auto lock bottom dieline in Adobe Illustrator or inspect your CubitPack PDF proof, the upper two-thirds of the template looks just like a standard tuck-end carton: four vertical panels (Back, Side, Front, Side) joined by a side glue flap, topped by two side dust flaps and a reclosable top closure panel with a tuck flap. The magic happens along the bottom edge of the dieline. Instead of a simple rectangular bottom flap, four shaped bottom lock flaps extend below the four body walls. Two of those flaps carry 45-degree diagonal score lines that allow a folder-gluer machine to fold and bond them directly to the two major interlocking bottom panels while the carton is still completely flat. Learning how those panels fold, which glue zones stay ink-free, and how artwork orients on each wall makes proof approval simple.
What are the panels and flaps on an auto lock bottom (ECMA A6020) dieline?
Viewed from the outside print surface from left to right, an auto lock bottom dieline groups its parts into three horizontal tiers: the top closure assembly, the four main vertical walls (plus the side glue tab), and the four bottom crash-lock flaps. You can adjust the exact Length, Width, and Height of this layout on our printed auto lock bottom boxes page and compare each part against the table below.
| Dieline part | Where it sits on the flat template | Mechanical role when folded | Artwork and prepress rule |
|---|---|---|---|
| Side glue flap | Narrow vertical strip on the far left edge of the Back panel | Tucks behind the far-right Side panel to bond the carton into a four-wall tube | Keep 100% free of ink, varnish, and lamination so adhesive bonds into the paper fibers |
| Back, Side, Front, Side walls | Four main vertical rectangles across the center row (W and L alternating) | Form the upright body of the box around your jar, bottle, or mug | Main exterior print faces; Front panel (highlighted in purple) is your primary shelf face |
| Top closure + tuck flap | Hinged to the top edge of the Front panel, ending in a curved tuck flap | Folds front-to-back over the top opening and slides inside the Back wall | Top closure panel shows from above; tuck flap is hidden inside once closed |
| Top side dust flaps | Attached to the top edges of the two Side walls | Fold inward 90 degrees under the top closure to block dust and square the top | Flood-coat in your background color so no white paperboard shows at the top corners |
| Major bottom lock panels (2) | Extend below the Front and Back walls, shaped with a center locking tongue and hook | Swing inward and hook together across the center of the floor when the carton opens | Form the visible outer bottom face; split across the middle by the interlocking seam |
| Diagonal bottom glue flaps (2) | Extend below the two Side walls, each bisected by a 45-degree diagonal score line | Fold double along the diagonal crease; outer triangle glues to the adjacent major bottom panel | Leave the outer glue triangles free of varnish; hidden underneath the major flaps when open |
How do the 45-degree diagonal creases and bottom glue triangles work?
The defining engineering feature of an auto lock bottom dieline is the pair of 45-degree diagonal score lines on the two bottom side flaps. On the converting line, a high-speed folder-gluer machine folds those two side flaps inward along the diagonal creases, applies cold-set or hot-melt packaging adhesive to the triangular outer halves, and folds the two major bottom panels up 180 degrees to bond onto those triangles. Because the diagonal crease hinges at exactly 45 degrees, the bonded bottom panels can lie completely flat inside the shipping case, yet the moment a packer squeezes the vertical corners of the carton toward each other, the glued triangles pull the major bottom panels down 90 degrees until their center tongues click together.
- Three glue points in total: 1 vertical side-seam glue flap + 2 triangular bottom glue zones.
- Automatic glue masking: When our prepress team prepares your digital proof, we mask out ink and lamination on the three glue zones so the adhesive forms a fiber-tearing bond.
- Flat storage: Even with three glued seams, the finished cartons ship and store completely flat until packing.
What are the cut, fold, bleed, and safe-zone rules on an auto lock dieline?
Just like on a custom straight tuck end box or a custom reverse tuck end box, an auto lock bottom dieline separates cutting blades from creasing rules using distinct line styles and colors. Keeping your background bleed and text safe zones aligned to these paths ensures that score lines fold cleanly without cracking headlines or clipping logos.
- Cut line (solid dark line): Where steel rule knives cut the outer profile of the top tuck flap, dust flaps, side glue tab, and interlocking bottom hooks.
- Fold / score line (dashed purple line): Where rounded rules press a hinge into the board along the four vertical corners, top lid, bottom crease, and 45-degree bottom diagonals.
- Bleed (0.125 in / 3 mm outside cut lines): Extend background colors, textures, and wraparound patterns at least 1/8 inch past every outer cut line.
- Safe margin (0.125 in inside paperboard creases; 0.25 in on corrugated): Keep all text, logos, borders, and icons safely inside the fold lines.
Know your size? Compare pricing across up to 3 quantities.
Request a Quote →How do I orient artwork and place the UPC barcode on the dieline?
When viewing the flat outside dieline with the top closure at the top and the bottom lock flaps at the bottom, all four vertical walls (Back, Left Side, Front, Right Side) stand right-side up. That means your logo on the Front panel, your ingredient list on the Side panels, and your story on the Back panel all read right-side up on the flat template. On the Top closure panel directly above the Front wall, orient your logo so the bottom of the letters faces the Front panel crease; that way, when a shopper looks down at the closed box from above while facing the Front panel, the top logo reads right-side up. Most importantly, never place your UPC barcode on the bottom lock flaps: because the interlocking tongue and diagonal seam cross the center of the base, place the barcode on the lower Back wall or one of the Side walls.
- Four body walls: All text and graphics stand upright on the flat outside dieline.
- Top closure lid: Orient artwork right-side up relative to the Front panel crease.
- UPC barcode placement: Place on the lower Back or Side panel inside a high-contrast white rectangle, at least 0.25 inches from any corner crease.
How do front windows and inside printing appear on the dieline?
If you add a die-cut window on the Front panel (either open so shoppers can smell a candle or patched with clear film like on our custom window boxes), the window opening is drawn as a closed solid cut path inside the Front panel rectangle. Leave at least 3/8 inch (9.5 mm) of paperboard margin between the window cut line and the surrounding score lines so the front wall does not buckle when the crash-lock base snaps open. Keep the bottom edge of any front window at least 1/2 inch above the bottom score line so the window patch film never interferes with the major bottom lock panel fold. If your order includes inside printing, we provide a mirrored Inside Surface dieline where you can place a pattern or welcome note across the interior walls and the underside of the top lid.
How do I get a custom auto lock bottom dieline and 3D proof?
You can preview an auto lock bottom dieline at your exact Length, Width, and Height right on the style page using our interactive dieline tool. When you request a quote (starting from 1,000 boxes, with standard 10–14 business day turnaround or 4–5 business day rush), our structural team sends a production-ready vector dieline at no cost, checks or sets up your artwork for free, and delivers a digital proof plus an interactive 3D mockup before you pay. You can also order a single custom prototype or our $50 pre-made sample kit to test the crash-lock base in hand. There are no die or plate charges, and shipping is free to all 50 US states.
What are the most common auto lock bottom dieline mistakes?
Check your artwork against these five prepress pitfalls before sending your file
- Placing the UPC barcode on the bottom lock flaps. The interlocking center tongue splits the base; always place the barcode on the back or side panel.
- Putting critical text or logos over the 45-degree diagonal bottom creases or glue triangles. Leave the bottom lock flaps for background color only.
- Drawing a front window too close to the bottom crease. Keep at least 3/8 inch of solid board around any window cutout so the base locks squarely.
- Forgetting to add 0.125 inch bleed past the top tuck flap and outer side cut lines.
- Merging the vector dieline strokes into the artwork layer. Keep cut and fold paths on a separate non-printing layer named Dieline.
Get an auto lock bottom dieline at your size
A simplified drawing for planning your design. Your free production dieline comes with your proof, made for your exact size and board.
Packaging for this

Ready to order auto lock bottom boxes? Compare up to 3 quantities with a free 3D mockup.
Request a Quote →Questions about auto lock bottom boxes
What is an ECMA A6020 auto lock bottom dieline?
ECMA A6020 is the European Carton Makers Association standard code for a long-seam-glued folding carton with a pre-glued automatic crash-lock bottom and a top tuck closure. Its flat dieline includes four vertical body panels, a top tuck lid with dust flaps, and four interlocking bottom flaps.
Why do two of the bottom flaps have diagonal crease lines?
The 45-degree diagonal crease lines allow the folder-gluer machine to fold the bottom side flaps in half and glue them to the major bottom panels while the carton lies flat. When you squeeze the carton open, those diagonal hinges pull the bottom panels down into a locked flat floor.
Do I need to mask out the glue zones on my artwork file myself?
If you set up your own vector dieline, leave the side glue flap and the two outer bottom glue triangles unprinted and unvarnished. Even if your background color covers the whole sheet, our prepress team automatically masks the glue zones on your digital proof before production.
Why can't I put my barcode on the bottom of an auto lock bottom box?
Unlike a straight tuck end box that has one solid bottom panel, an auto lock bottom forms its floor from four overlapping panels that meet at a diagonal seam and center tongue. A barcode printed across that seam can shift slightly and fail to scan, so place it on the back or side wall.
How much bleed and safe zone should I leave on an auto lock bottom dieline?
Extend all background colors and patterns at least 0.125 inches (1/8 inch) outside the solid cut lines for bleed, and keep all text, logos, and borders at least 0.125 inches inside every cut and fold line (0.25 inches if using fluted corrugated board).
Can CubitPack place my artwork onto the auto lock bottom dieline for me?
Yes. Every order includes a free custom structural dieline and free design help to place your logo, typography, or AI-generated artwork across the panels. We send a digital proof and a 3D mockup for your approval before you pay.
Still have a question? Ask a packaging specialist.
Request a Quote →Request your auto lock bottom boxes quote
Tell us your size and quantities, and one dedicated account manager prepares pricing for each tier.
- Free design & AI-to-print studio + 3D mockup
- No die or plate charges · 4–5 day rush available
- Free shipping to all 50 states
- 10% off your first order
We verified the ECMA A6020 crash-lock bottom panel geometry, 45-degree diagonal crease mechanics, folder-gluer adhesive masking zones, and prepress bleed/safe standards against European Carton Makers Association standards and Paperboard Packaging Council guidelines. A packaging specialist checked every rule. Spot something wrong? Tell us and we fix it.
Sources
What changed
- October 24, 2026: First published with ECMA A6020 panel table, diagonal bottom crease diagram, and glue-zone prepress checklist.
More guides
New packaging guides by email
Sizes, materials and design tips. Unsubscribe anytime.