
How do you design inside-printed mailer lids with scannable QR codes, onboarding steps, and flood coats?
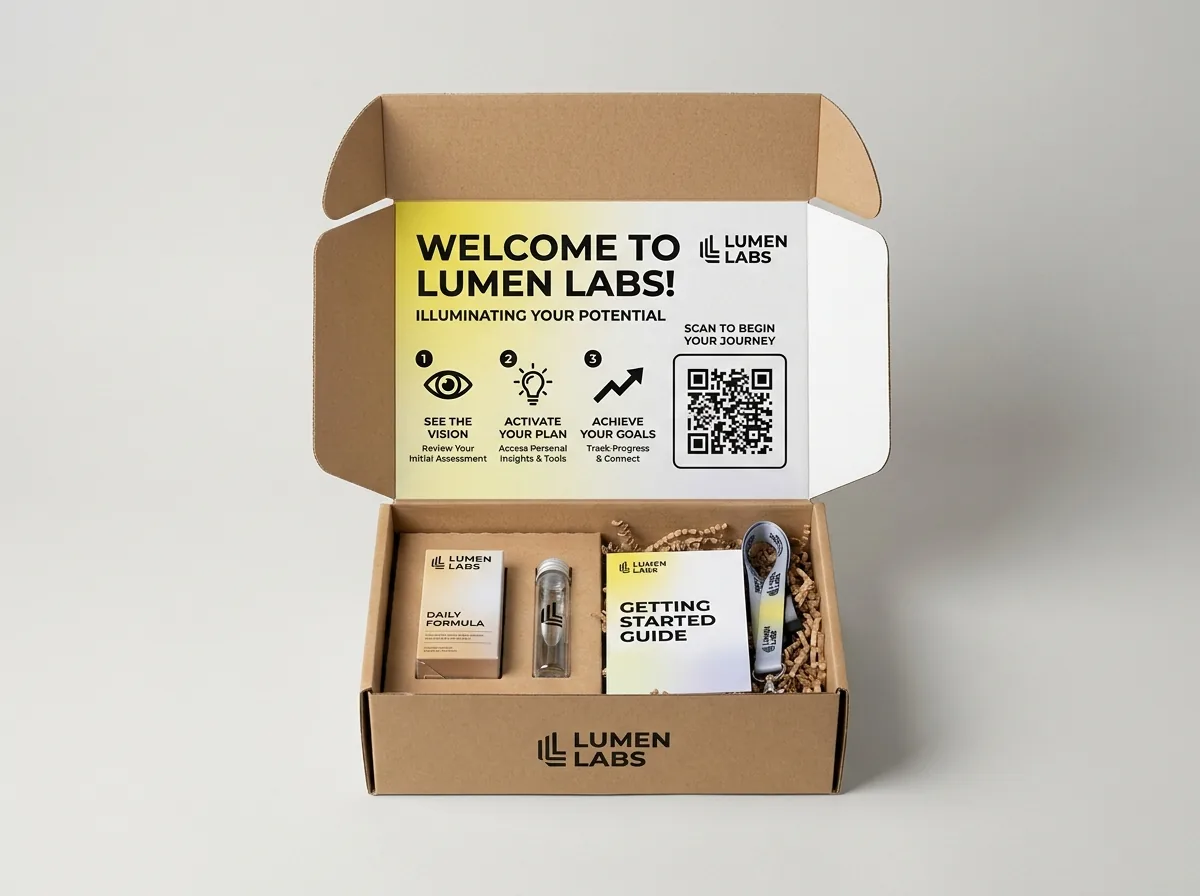
Short answer: Place your welcome headline, 3-step product ritual, and a high-contrast 20 × 20 mm (0.8 × 0.8 in) QR code inside the central 60% of the inner lid panel (clear of the side dust wings), and seal dark interior flood coats with aqueous satin varnish or matte lamination.
On this page
- What 4 inside-lid layout architectures work best for D2C, subscription, and PR mailers
- What size, contrast, and placement rules guarantee scannable QR codes on corrugated board
- How do you coordinate interior flood coats with score lines, tissue paper, and fitted inserts
- How do you prototype and order your inside-printed mailer box in 4 steps
- Common mistakes
- FAQs
Request a custom quoteFree dieline & 3D mockup
When a customer opens custom printed-inside mailer boxes, the hinged top lid swings upward to a 95-to-110-degree angle directly in their line of sight, making the inside lid the highest-readability piece of real estate in e-commerce packaging. Printing your welcome note, step-by-step usage guide, social sharing callout, and a scannable reorder or onboarding QR code directly onto the inside lid eliminates the cost, inventory tracking, and warehouse kitting labor of loose printed postcards, while ensuring the message never gets lost under tissue paper. To guarantee 100% first-pass smartphone scanning on corrugated board, size inside-lid QR codes at least 0.8 × 0.8 inches (20 × 20 mm) with a 4-module white quiet zone and print the modules in 100% black or high-contrast dark ink on a matte or satin-sealed liner. Order two-sided printed mailers from 250 units with free 3D proofs and free US shipping.
What 4 inside-lid layout architectures work best for D2C, subscription, and PR mailers?
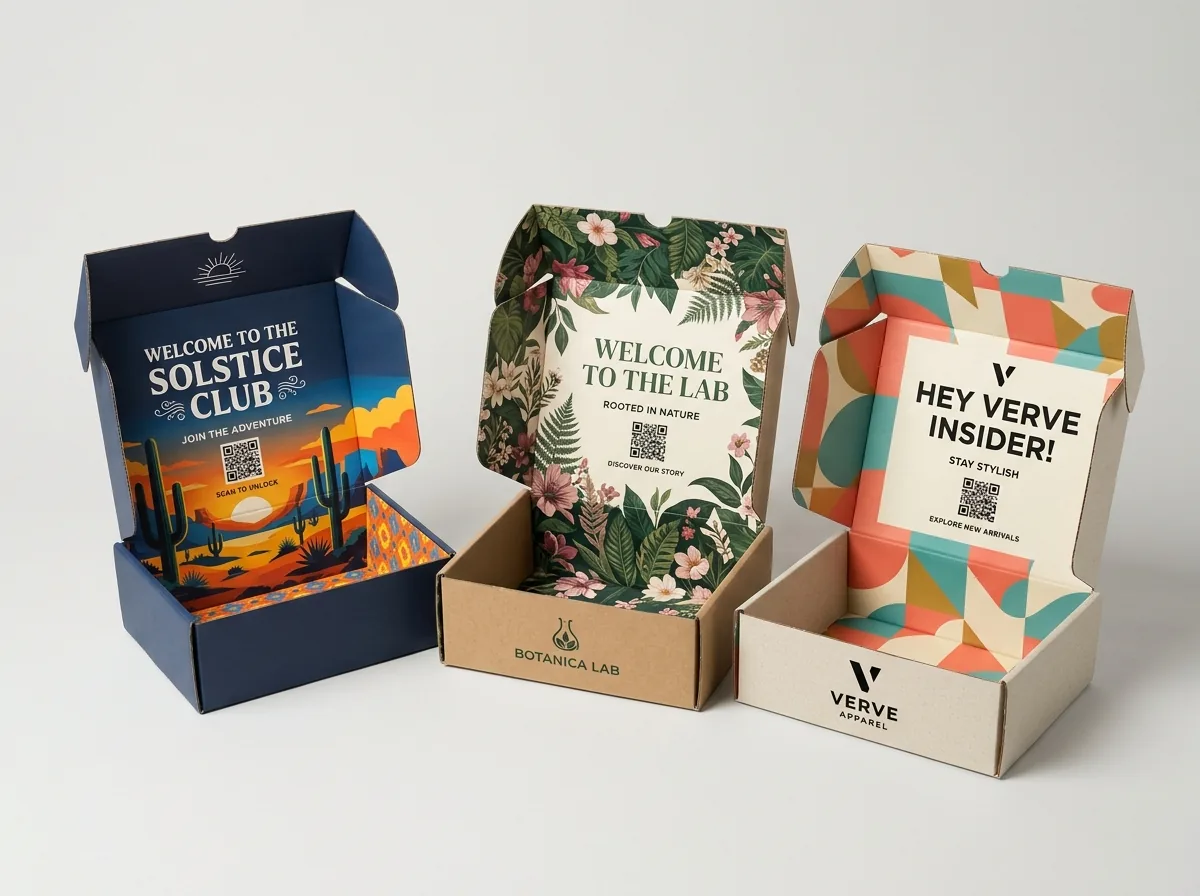
Across two-sided printed mailer boxes, custom subscription boxes, custom influencer boxes, and custom unboxing boxes, the most effective interior designs divide the box into two visual zones: the Inside Lid Billboard (for typography, storytelling, and QR codes) and the Cavity Stage (the floor, rolled side walls, and dust wings that frame the product): Compare four proven interior layout architectures and how they replace separate printed collateral: Consolidating your welcome postcard, usage guide, and promotional insert directly onto the inside lid also improves sustainability and unit economics at scale. A typical 4 × 6 inch 14 pt gloss postcard adds printing cost, separate freight and warehouse bin tracking, and 6 to 10 seconds of manual pick-and-pack labor on every box, and still risks slipping underneath tissue paper or crinkle fill where the buyer never sees it. When that same message is printed in 36 pt display type across the inside lid panel, every single customer reads it in the exact sequence you intended while reducing total paper weight and fulfillment complexity.
- Eliminates postcard kitting errors: Warehouse packers never forget to insert a thank-you card or put the wrong seasonal insert into a box because the message is permanently printed on the lid.
- Always upright on camera: In vertical smartphone unboxing videos (9:16 aspect ratio), the open inside lid sits directly in the upper half of the camera frame above the product.
- Zero loose paper clutter: Customers go straight from reading the lid to lifting out the product.
| Interior layout archetype | Inside lid billboard content | Floor & rolled side-wall treatment | Collateral it replaces | Best D2C category fit |
|---|---|---|---|---|
| 1. The Onboarding Ritual Grid | Welcome headline + 3-column Step 1, 2, 3 icon guide + tutorial QR code | Solid brand flood coat framing products or fitted card insert | Printed instruction leaflet / regimen card | Skincare routines, supplements, starter kits |
| 2. The Founder Letter & Reorder Portal | Short 40-word founder note + printed signature + VIP reorder QR code | Repeating monogram or botanical pattern across floor & dust wings | 4 × 6 in thank-you postcard + discount voucher | Coffee, wellness, apparel, gourmet food |
| 3. The Creator Camera Frame | Bold oversized 3-to-5 word campaign slogan + @handle / #hashtag | High-contrast color block or holographic foil accent on matte board | Press release cover sheet in PR kits | Influencer seeding, beauty launches, merch drops |
| 4. The Monthly Theme Mural | Full-bleed seasonal illustration + curated item checklist + Spotify QR | Edge-to-edge illustrated wrap continuing onto rolled side walls | Monthly curation booklet or menu card | Monthly subscription clubs & gift baskets |
What size, contrast, and placement rules guarantee scannable QR codes on corrugated board?
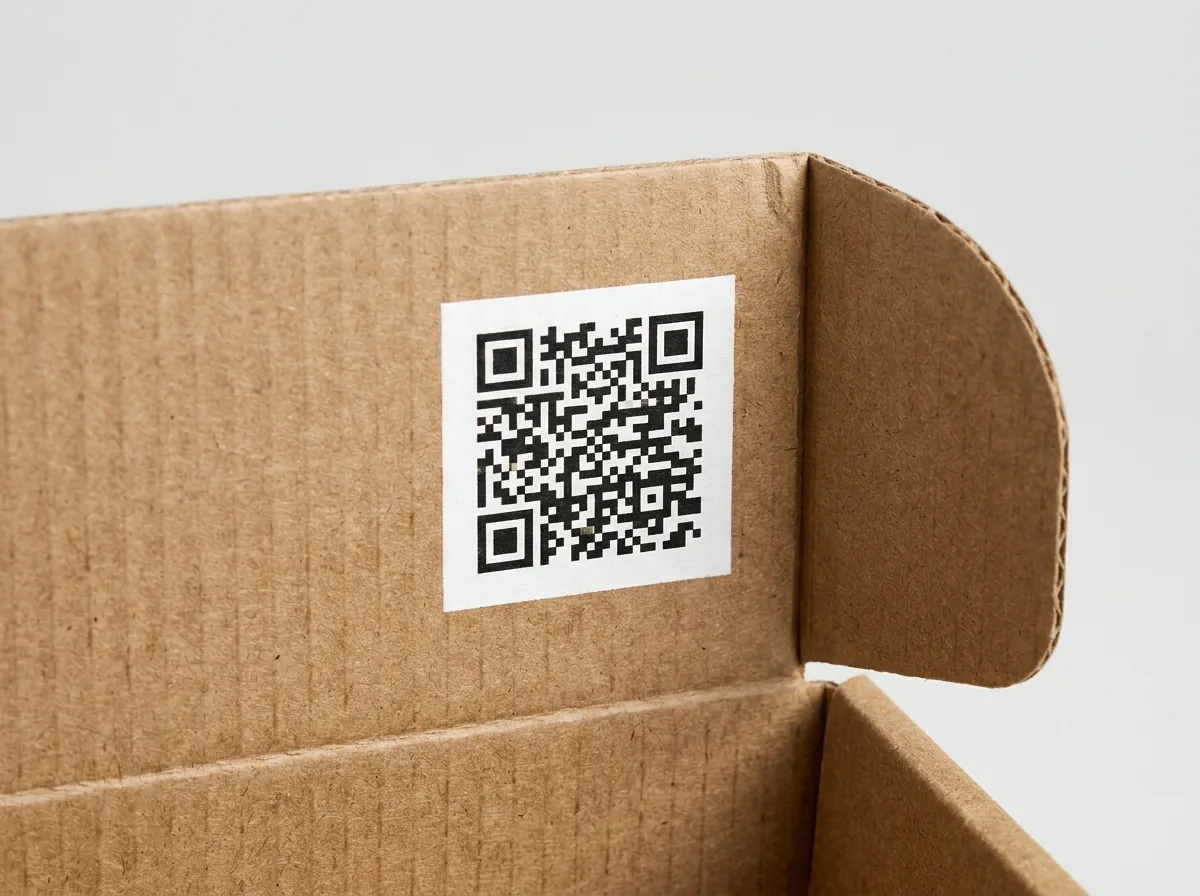
Printing a QR code inside the lid of a custom mailer box connects physical packaging to digital retention: brands link inside-lid QR codes to 60-second usage videos, one-click subscription reorders, loyalty point claims, or curated playlists. However, corrugated board has a subtle micro-flute surface wave (90 flutes per foot on E-flute, 47 flutes per foot on B-flute) and overhead room lighting can create glare if the code is printed too small or without sufficient contrast. Follow these engineering specs so iPhone and Android cameras scan your inside-lid QR code instantaneously from 10 to 18 inches away
- Minimum QR code dimensions: Make the QR matrix at least 0.8 × 0.8 in (20 × 20 mm), or 1.0 × 1.0 in (25 × 25 mm) on larger B-flute boxes, and use a dynamic short URL so the module grid stays clean and low-density.
- Mandatory 4-module white quiet zone: Surround the QR code with a solid white border at least 4 modules wide (approx. 3.0 to 4.0 mm) on all four sides, especially when the inside lid has a dark flood coat or busy botanical pattern.
- Positive dark-on-light contrast: Print dark modules (100% black or a deep navy/forest Pantone with >70% reflectance contrast) over a bright white knock-out box; never print inverted light-pastel QR codes on a mid-tone background.
- Center-zone placement clear of dust wings: Position the QR code inside the central 60% of the lid width and at least 0.75 in (19 mm) above the rear hinge crease so neither the side dust wings nor the product blocks the camera view.
How do you coordinate interior flood coats with score lines, tissue paper, and fitted inserts?
When flooding 100% of the interior cavity with ink, or pairing custom printed-inside mailer boxes with custom mailer boxes with inserts, three finishing details separate luxury retail execution from amateur printing: For brands that refresh their promotional offer or onboarding video seasonally while keeping the same physical mailer box inventory for 6 to 12 months, always encode a dynamic redirect URL (such as yourdomain.com/welcome) inside the printed lid QR code rather than hard-coding a static campaign URL. With a dynamic redirect on your own domain, you can update the destination landing page, swap the seasonal tutorial video, or rotate the reorder discount code anytime in seconds without changing a single printing plate on your mailer boxes.
- Test your headline hierarchy at arm's length: Set your primary inside-lid welcome headline at 24 pt to 48 pt bold type, and keep body copy at 11 pt to 14 pt with generous line spacing.
- Avoid placing fine horizontal rules directly on the rear lid hinge crease: Let background flood colors or organic patterns cross the score line naturally.
- Use our interactive 3D proof to check the open sightline before press production.
| Interior design element | Best prepress & finishing practice | Problem it prevents |
|---|---|---|
| Heavy dark interior flood coat (navy, black, emerald) | Add interior aqueous satin seal or 18-micron matte BOPP lamination | Stops ink rub-off on white apparel or frosted jars AND prevents crease cracking |
| Continuous pattern across floor & side walls | Extend pattern onto Side A outer side-wall roll-over panels | Ensures the pattern wraps 180° over the locked side rails without white gaps |
| Paired with a printed card or E-flute insert | Print outer box inside liner and insert sheet on the same press calibration | Guarantees zero Delta-E color shift between the inner lid and the insert deck |
| Paired with custom tissue paper & sticker | Pick one secondary accent color from the inside lid for the tissue seal | Creates a layered 2-step reveal (open lid -> read headline -> break tissue seal) |
Know your size? Compare pricing across up to 3 quantities.
Request a Quote →How do you prototype and order your inside-printed mailer box in 4 steps?
Pair this creative design guide with our technical tutorial on two-sided dieline setup for printed-inside mailer boxes and our board comparison of Kraft-Outside / White-Inside vs All-White inside-printed mailers. You can also verify your dimensions in our box size calculator and dimensional weight calculator. Follow these four steps to build your custom two-sided mailer from 250 units: When reviewing your interactive 3D digital proof before press sign-off, rotate the model through a full 360-degree turn in both the closed shipping state and the open unboxing state. Confirming that the interior lid welcome headline, side dust wings, and rolled side walls align cleanly on the 3D proof guarantees your production run arrives ready for immediate fulfillment.
- Step 1: Choose your interior layout, Onboarding Ritual Grid, Founder Note + Reorder QR, Creator Camera Frame, or Monthly Theme Mural.
- Step 2: Generate a dynamic short-URL QR code (at least 0.8 × 0.8 in with a white quiet zone) and test-scan it on your screen.
- Step 3: Request your free two-sided 2D CAD dieline and interactive 3D digital proof in CubitPack's quote form (from 250 boxes).
- Step 4: Approve your 3D proof for 10–14 business day turnaround (4–5 day rush) with zero die or plate fees and free US ground shipping.

What 5 interior design mistakes hurt unboxing readability and QR scan rates?
Avoid unscannable QR codes and cluttered lids by checking your interior layout against these five design mistakes
- Printing a tiny 0.4-inch QR code with a long, dense raw URL directly over a dark or patterned background without a white quiet zone border.
- Crowding the inside lid with 250+ words of tiny 7 pt text instead of a punchy headline, 3 icon steps, and a scannable QR code.
- Placing logos or QR codes in the outer 1.25-inch left and right margins of the inside lid where the folded side dust wings obscure them.
- Using high-gloss UV coating directly over an inside-lid QR code, which can create overhead ring-light glare during smartphone scanning (use a matte or satin finish over the QR zone instead).
- Forgetting to rotate the inside-lid layout 180 degrees opposite the outside lid on the flat Side B dieline.
Packaging for this
Ready to order printed inside mailer boxes? Compare up to 3 quantities with a free 3D mockup.
Request a Quote →Questions about printed inside mailer boxes
What is the minimum size for a scannable QR code inside a mailer box lid?
Size inside-lid QR codes at least 0.8 × 0.8 inches (20 × 20 mm), and preferably 1.0 × 1.0 inch (25 × 25 mm), with a 4-module solid white quiet-zone border and 100% black or high-contrast dark modules.
Does printing a welcome message and QR code inside the lid save money on postcards?
Yes. Printing your welcome note, usage instructions, and QR code directly on the inside lid eliminates the cost of printing separate 4 × 6 inch postcards and saves 5 to 10 seconds of manual card-stuffing labor on every order.
Where is the best spot to place a QR code inside a roll-end tuck-front mailer box?
Place the QR code in the central 60% of the inside lid panel (either centered below your welcome headline or in the lower-right safe zone, at least 1.5 inches inward from the left/right edges and 0.75 inches above the rear hinge crease) so the side dust wings never cover it.
Can I combine foil stamping or Spot UV with interior CMYK printing?
Yes. You can add metallic gold, silver, rose-gold, or holographic hot foil stamping, or tactile gloss Spot UV over matte lamination, to the inside lid headline or monogram for a luxury PR or VIP unboxing reveal.
Can I preview how my inside-lid design and QR code look in 3D before printing?
Yes. Every CubitPack order from 250 boxes includes a free interactive 3D digital proof that lets you open and close the virtual mailer box to inspect your interior lid orientation, side walls, and floor before payment.
Still have a question? Ask a packaging specialist.
Request a Quote →Request your printed inside mailer boxes quote
Tell us your size and quantities, and one dedicated account manager prepares pricing for each tier.
- Free design & AI-to-print studio + 3D mockup
- No die or plate charges · 4–5 day rush available
- Free shipping to all 50 states
- 10% off your first order
We verified FEFCO 0427 inside-lid dust-wing clearance zones, ISO/IEC 18004 QR code module sizing and quiet-zone contrast rules on corrugated liners, and TAPPI T 830 rub-resistance standards against FEFCO Case Code standards and Fibre Box Association (FBA) guidelines. Spot something wrong? Tell us and we fix it.
Sources
What changed
- November 11, 2026: First published with 4 inside-lid layout archetypes, corrugated QR code sizing rules, and flood-coat finishing table.
More guides
New packaging guides by email
Sizes, materials and design tips. Unsubscribe anytime.