
How do you design perforated tear strips and dividers for snack boxes?
Short answer: Design your custom snack boxes in two states - closed for shipping and open on the counter. Keep your main logo and flavor callout on the lower 1.5 inch front tray lip and on the fold-up header so tearing away the perforated hood never discards your branding.
On this page
- How do you keep your logo visible after the perforated caddy hood is torn off
- What are the key structural rules for tray lips, perforations, and dividers
- How do you orient artwork on a fold-up header card so it never faces backward
- How do you design cardboard dividers and windows for bistro and variety boxes
- How can you share one caddy and divider dieline across your entire snack line
- Common mistakes
- FAQs
Request a custom quoteFree dieline & 3D mockup
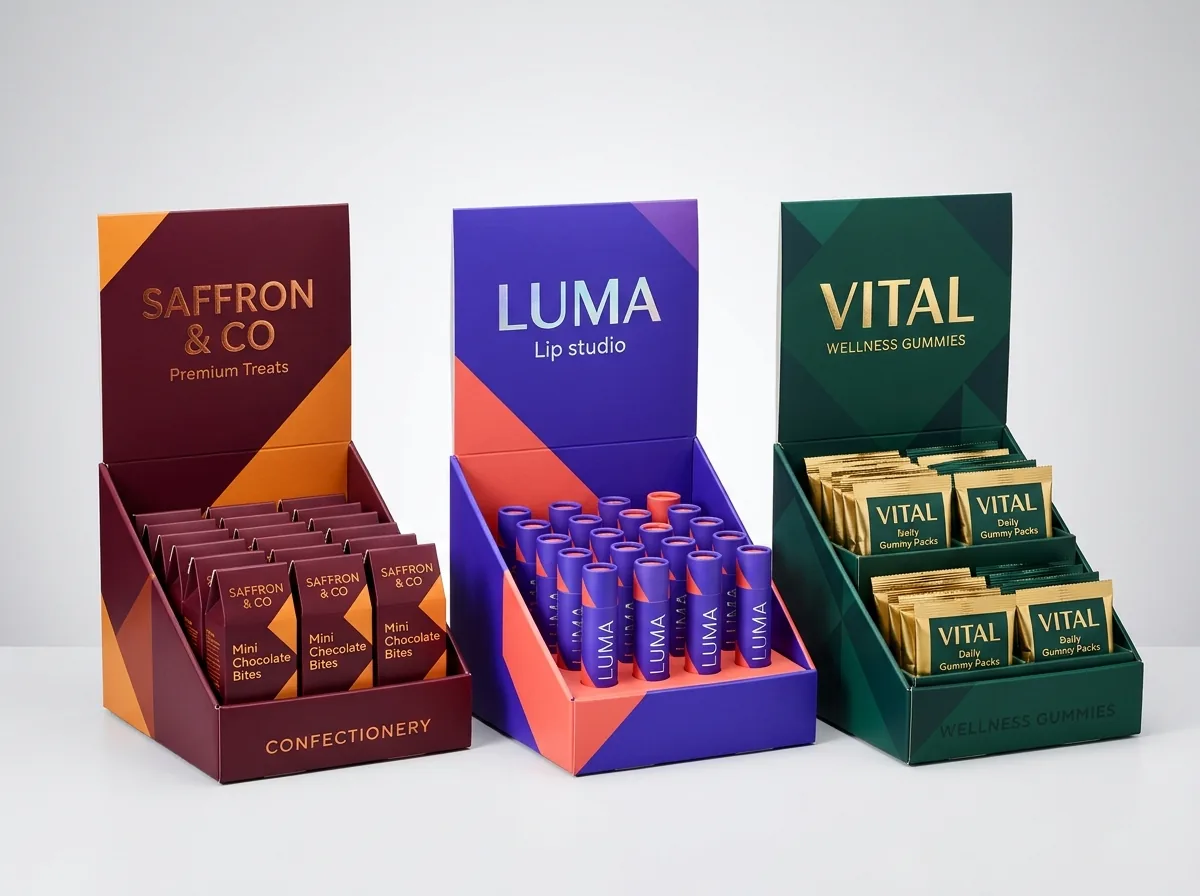
Unlike a static carton that looks the same from warehouse to shelf, a perforated snack display caddy changes shape the moment a store clerk pulls the tear strip. Half of the front panel and diagonal sections of both side walls are ripped off and tossed in the recycling bin, while the top lid folds backward to become a vertical header billboard. Designing artwork for that transformation requires mapping your graphics to two separate states: the closed wholesale carton and the open checkout tray. When you also pack multi-item bistro boxes or DTC snack assortments, internal die-cut cardboard dividers must lock heavy dip cups and drinks away from fragile chips without blocking the view through a top window. At CubitPack, our structural designers build your perforated dieline, divider grid, digital proof, and 3D mockup for free before payment.
How do you keep your logo visible after the perforated caddy hood is torn off?
The most expensive design blunder on a checkout counter display happens when a graphic designer centers a big, beautiful brand logo right in the middle of the front panel - only to realize on launch day that the perforated tear line cuts right through the wordmark, and the top 70% of the front panel gets thrown away by the cashier. When laying out artwork on perforated snack caddies, treat the perforation line on the dieline as a hard horizon. Everything below the front perforation line stays permanently on the counter as the front tray lip; everything in the middle hood zone is temporary shipping cover; and the scored top lid folds up behind the bars to become your main eye-level sign. Placing your primary logo and flavor banner on both the lower front tray lip and the fold-up header ensures shoppers recognize your brand from across the checkout lane. Before sending your artwork to press, print our 2D dieline on plain office paper, tape the corners together, and tear off the hood panel by hand. Seeing which graphics remain on the tray and which land in the trash makes two-state layout completely intuitive for your creative team.
- Lower front tray lip (permanent): place your brand logo, flavor name, and key dietary badge (for example, '12g Protein · Gluten Free') inside the bottom 1.25 to 1.75 inches.
- Fold-up top header (permanent when open): repeat your brand logo, hero snack illustration, and value proposition on the fold-up lid panel.
- Removable front hood (discarded at register): print a clean flavor pattern or wholesale case info, plus a dashed 'Pull here to open for display' prompt.
- Side walls (angled slope): align side-panel text parallel to the bottom edge below the diagonal perforation line so words are not sliced in half.
What are the key structural rules for tray lips, perforations, and dividers?
Use the engineering reference table below when setting up a perforated counter display, a gravity-feed pantry dispenser, or a compartmentalized snack box. CubitPack's structural team sets these knife, score, and perforation rules on your free custom dieline so your graphic designer can focus purely on typography, color, and photography. Notice how the front lip height is always proportional to the standing height of the snack inside: too low and bars topple forward onto the counter; too tall and shoppers cannot read the flavor on the individual wrapper. Matching these ratios early keeps both your co-packer and your retail buyers happy.
| Structural feature | Recommended spec | Why it matters on shelf or in transit |
|---|---|---|
| Front tray lip height | 1.25 to 1.75 in (25%–35% of bar height) | Holds standing bars upright while showing 65%+ of the wrapper |
| Perforation cut-to-tie ratio | Roughly 60%–70% cut to 30%–40% tie | Stays shut in master shipping cases; tears cleanly in one pull |
| Artwork safe zone from perf | At least 3/16 in (0.1875 in) clear | Prevents paper fiber tear from ripping into logos or text |
| Fold-up header orientation | Printed on interior lid or fold-over flap | Ensures the header faces forward when the lid folds back |
| Gravity dispenser slot height | 1.5× single pouch thickness | Allows one pouch to slide out without jamming the stack |
| Bistro / mailer divider height | Full inside box height minus 1/16 in | Stops nuts, crackers, or dip cups from jumping over walls |
How do you orient artwork on a fold-up header card so it never faces backward?
On a standard folding carton, ink is printed only on the outside (clay-coated) surface of the paperboard, while the inside surface stays unprinted white or brown fiber. On a simple counter display box where the top lid hinges backward 180 degrees to stand up behind the tray, the surface that faces the customer when open is actually the *inside* of the lid. You have two clean ways to handle this without ending up with a blank white header. First, you can select 'Outside + inside' printing so the interior of the lid carries your full-color billboard header. Second - and often more economical on single-sided press runs - our structural designers can build a double-walled fold-over header lid that folds forward and tucks into the tray, keeping the outside coated print surface facing the shopper on both the tray and the header.
Know your size? Compare pricing across up to 3 quantities.
Request a Quote →How do you design cardboard dividers and windows for bistro and variety boxes?
When you pack four or more different food items into one box - such as an airline bistro snack kit with seed crackers, dark chocolate almonds, dried mango, and a 2 oz hummus cup, or a 16-item DTC snack sampler mailer - loose items shift and collide during transit. Adding a die-cut custom cardboard insert or interlocking partition grid locks each item into its own zone so a heavy dip cup never crushes delicate flatbread crackers. If your bistro or sampler box also includes a top window cutout, align the internal divider walls directly beneath the window bridges or frame them symmetrically inside the clear film opening. Keep the outer border of the window at least 5/8 inch inside the box fold scores so the lid retains its torsional stiffness, and ask for food-safe board and grease-resistant barriers on request if unwrapped crackers or pretzels rest directly against the compartments.
How can you share one caddy and divider dieline across your entire snack line?
Snack brands frequently launch with four to six flavors of the same bar or pouch (for example, Salted Caramel, Peanut Butter, Double Chocolate, Lemon Zest, and Berry Chia). Designing custom perforations and divider inserts from scratch for each flavor is unnecessary when all wrappers run on the same flow-wrap machine at the same cut length. By keeping the inside Length × Width × Height, perforation path, and header shape identical across every SKU, you can combine all four or six flavors into a single CubitPack production order with zero die or plate charges. Use high-contrast color blocking on the bottom 1.5 inch front tray lip and top header so retail clerks, warehouse pickers, and shoppers can tell flavors apart at a single glance across a crowded shelf.
- Shared caddy dieline: keep identical cut, score, and perforation lines across all bar flavors to combine quantities in one run.
- Color-coded tray lip: assign a distinct Pantone color band to the lower 1.5 inch front lip for each flavor.
- Dual-UPC placement: place the 12-pack carton barcode on the bottom panel so single-bar wrapper barcodes stay hidden until opened.
- Shared divider grid: size variety-mailer partitions so seasonal snack swaps fit the same 4-cell or 6-cell insert all year.
What are the most common snack box tear-strip and divider mistakes?
Check these five prepress and structural errors on your flat proof and 3D mockup before going to press
- Centering the only brand logo in the middle of the front panel where the perforated tear-away hood gets ripped off and discarded.
- Designing the fold-up header artwork on the outside of a single-fold lid so it faces the wall behind the counter when opened.
- Placing small nutrition text or logos within 1/16 inch of a perforation line where fiber tear can clip the letters.
- Making bistro-box divider walls 1/2 inch shorter than the box ceiling, letting nuts and crackers mix over the top of the partitions.
- Cutting a top window right up to the corner fold scores of a snack box without leaving a 5/8 inch structural frame.
Find your size
Suggested inside size: 5.5 × 2.0 × 6.25 in
A starting point. Your account manager confirms the size with you before the proof.
Quote this size →Packaging for this

Ready to order snack boxes? Compare up to 3 quantities with a free 3D mockup.
Request a Quote →Questions about snack boxes
Do you charge extra die fees for perforated tear strips, headers, or window cutouts?
No. CubitPack never charges die or plate fees. Whether your snack box needs a wrap-around zipper tear strip, a die-cut fold-up header silhouette, a bottom gravity-feed door, or a custom window opening, the tooling is included free.
How do I know which way the fold-up header faces on my flat dieline template?
Our structural designers label every panel on your free vector dieline with 'Front Tray Lip (Stays)', 'Removable Tear Hood', and 'Header Face (Top Up When Open)', and we generate an interactive 3D mockup so you can inspect the open box before paying.
How do you prevent perforated snack caddies from popping open during parcel or pallet shipping?
We calibrate the perforation cut-to-tie ratio (the length of each blade cut vs the uncut paper bridge between cuts) to match your exact paperboard caliper or E-flute corrugated weight, and we pack caddies snug inside master shipping cartons.
Can you make grease-resistant dividers for bistro and charcuterie snack boxes?
Yes. When unwrapped crackers, pretzels, cheeses, or nuts touch the box or divider walls directly, we produce both the outer carton and the internal cardboard partitions on request in a certified partner facility with food-safe materials and grease barriers.
Can I print a tasting guide on the inside lid of a variety snack mailer instead of using a separate card?
Yes. Printing your flavor map, allergen icons, and reorder QR code directly on the inside lid of an E-flute corrugated snack mailer saves the cost of packing a separate paper insert card and guarantees every customer sees it on opening.
Can I order a physical prototype to test the tear strip and divider fit before full production?
Yes. Every order includes a free digital proof and 3D mockup before payment, and you can also request a paid custom printed prototype cut with your exact perforation and divider pattern (credited toward your production order).
Still have a question? Ask a packaging specialist.
Request a Quote →Request your snack boxes quote
Tell us your size and quantities, and one dedicated account manager prepares pricing for each tier.
- Free design & AI-to-print studio + 3D mockup
- No die or plate charges · 4–5 day rush available
- Free shipping to all 50 states
- 10% off your first order
The tray-lip ratios, perforation cut-to-tie guidelines, and divider clearance specs in this article come from standard folding carton die-cutting practices and retail checkout display requirements. A CubitPack packaging specialist verified every section. Spot an error? Tell us and we will fix it.
Sources
What changed
- October 22, 2026: First published.
- October 22, 2026: Updated specifications, terminology, and verified source links.
More guides
New packaging guides by email
Sizes, materials and design tips. Unsubscribe anytime.