
How do collapsible rigid box dielines, 45-degree corner gussets, and 3M tape work?
Short answer: A custom collapsible rigid box uses a two-part bonded CAD structure, a 4-panel hinged outer rigid jacket joined at the floor to a 4-wall tray frame with four 45-degree diagonal origami corner gussets, that ships 100% flat and locks at 90 degrees via pre-applied 3M corner tape or hidden corner magnets.
On this page
- How is a custom collapsible rigid box dieline structured across its outer jacket and folding tray
- How do the four 45-degree diagonal origami corner gussets fold flat without cracking
- Should I choose pre-applied 3M peel-and-seal corner tape or reusable concealed corner magnets
- How do separate drop-in EVA foam, molded pulp, and paperboard inserts work with collapsible boxes
- How do I prepare artwork and sign off on my collapsible rigid box dieline
- Common mistakes
- FAQs
Request a custom quoteFree dieline & 3D mockup
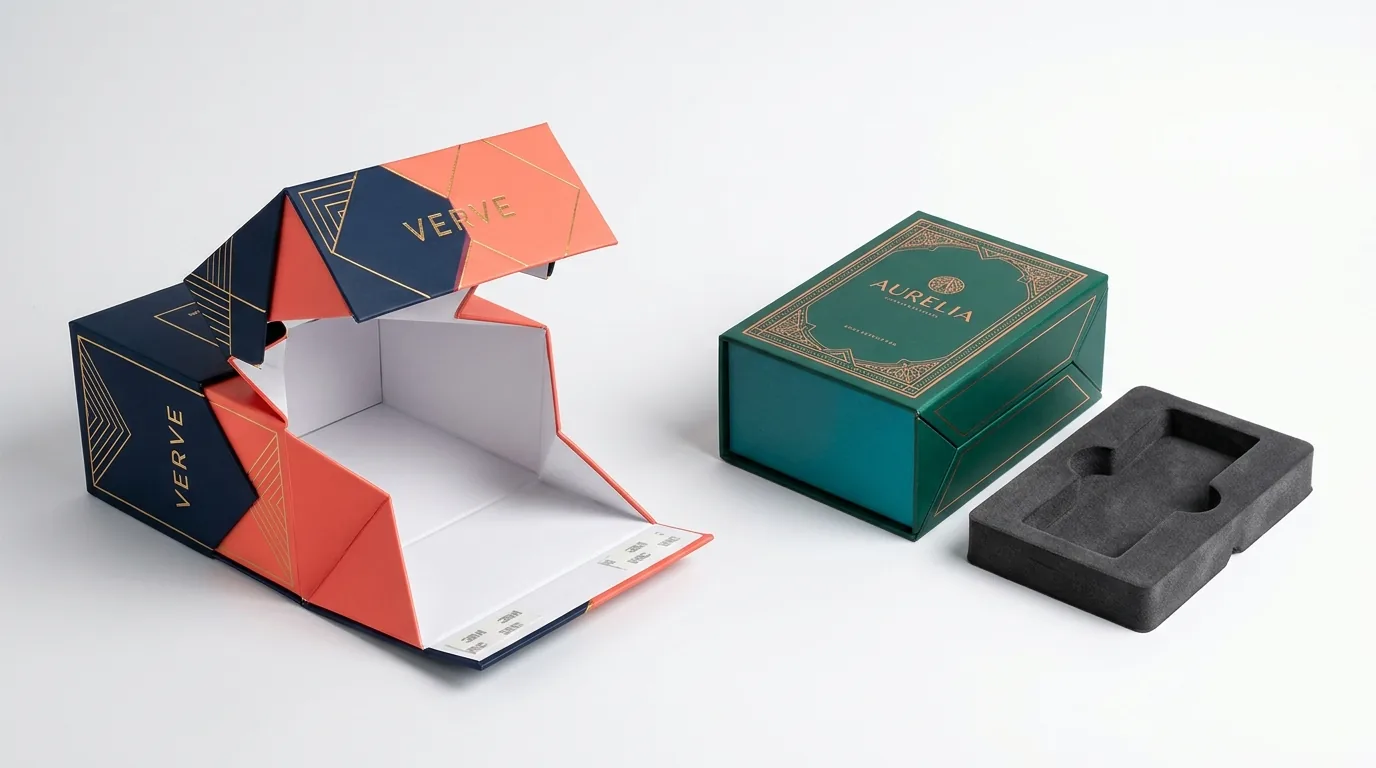
When preparing artwork and structural CAD files for custom collapsible rigid boxes, our prepress team coordinates two permanently joined grayboard sub-assemblies that fold flat together as a single ~10 mm blank. Sub-assembly A is the four-panel outer hinged rigid jacket (under-floor board, back spine board, top lid board, and front magnetic flap) wrapped in 157 gsm laminated art paper or woven cloth with 15 to 18 mm turned-in edges. Sub-assembly B is the collapsible four-wall interior tray frame whose floor glues permanently to the outer under-floor board and whose four corners use split 45-degree triangular origami gussets. During shipping, those diagonal gussets fold inward like bellows so all four walls lie flat; at the fulfillment station, lifting the front and back walls pulls the side walls to 90 degrees, where four pre-applied 3M 9448A adhesive strips or concealed corner magnets lock the box into a rigid vault.
How is a custom collapsible rigid box dieline structured across its outer jacket and folding tray?
Unlike a traditional set-up rigid box where four tray walls are corner-stayed into a fixed 3D tub at the factory, a collapsible rigid box replaces rigid corner-stay tape with articulated origami corner panels. Understanding both layers of your vector proof ensures your exterior artwork, interior flood print, and magnet clearances align to the millimeter: Unlike one-piece paperboard cartons, each panel in these two sub-assemblies uses solid high-density grayboard edges wrapped cleanly before final floor lamination
- Sub-Assembly A (The 4-Panel Outer Rigid Jacket): Consists of four rectangular 1.5–2.5 mm grayboard pieces, Outer Base Floor, Back Spine Board, Top Lid Board, and Front Magnetic Flap, spaced 6.0 to 8.0 mm apart on a continuous outer wrap sheet. Two recessed N35–N42 neodymium magnets sit near the lower edge of the Front Magnetic Flap, and an inner lid liner conceals the 15–18 mm wrap turn-ins.
- Sub-Assembly B (The Collapsible 4-Wall Tray & Origami Gussets): Consists of a center Inner Base Floor flanked by the Front Wall, Back Wall, Left Side Wall, and Right Side Wall. Instead of cutting away the four corner squares, each corner square is split diagonally at 45 degrees into two triangular grayboard halves wrapped in flexible laminated paper or cloth. When the front and back walls fold down, the diagonal crease pulls the left and right walls flat onto the floor.
How do the four 45-degree diagonal origami corner gussets fold flat without cracking?
The four 45-degree diagonal corner gussets experience the sharpest bend angle anywhere on a rigid box: when collapsed in the shipping carton, the flexible crease between the two triangular grayboard halves folds a full 180 degrees back on itself. If an inexperienced manufacturer wraps those corner gussets in unlaminated coated paper or leaves zero gap between the triangular grayboard pieces, the paper fibers crack along the diagonal line on the very first pop-up. Our tooling prevents crease failure using four calibrated rules: Every hinge gap across both the outer four-panel jacket and the interior collapsible walls is engineered to absorb the combined thickness of the grayboard, adhesive layer, and turned-in art paper without stressing the crease fibers
| Collapsible dieline zone | Target structural specification | Material & lamination rule | What this prevents in fulfillment |
|---|---|---|---|
| 45° Diagonal Gusset Hinge Gap | 4.0 to 6.0 mm board-free diagonal channel | BOPP matte, soft-touch, gloss film, or cloth | Eliminates grayboard edge pinching and diagonal paper splitting |
| Wall-to-Floor Hinge Channels | 5.0 to 6.5 mm flexible base hinge relief | 157 gsm C1S + BOPP film bonded to liner | Allows side walls to swing smoothly from 0° flat to 90° upright |
| Outer Spine Hinge Channels (3 joints) | 6.0 mm (1.5–2.0 mm board) · 8.0 mm (2.5 mm) | Grain direction parallel to horizontal spine (L) | Prevents ink cracking across the back spine and magnetic front flap |
| Wrap Turn-In Margin | 15.0 to 18.0 mm on all exposed outer edges | Extend background bleed across full turn-in | Hides raw grayboard edges when viewing the open box rim |

Should I choose pre-applied 3M peel-and-seal corner tape or reusable concealed corner magnets?
Once your packer lifts the front and back tray walls upright, the triangular corner gussets fold neatly against the inside of the left and right walls. You can lock those four corners at 90 degrees using either permanent high-tack 3M double-sided adhesive strips or non-permanent concealed neodymium magnets. Both options ship 100% flat at the exact same ~10 mm blank thickness, and choosing between them depends on whether your box is a one-time e-commerce shipment or a reusable retail keepsake
- Genuine 3M 9448A peel-and-seal corners: Engineered with oversized white silicone finger-pull tabs that overhang the corner gusset edge by 6 mm so warehouse packers wearing gloves can grip and strip all four liners in under 6 seconds.
- Concealed N42 neodymium corner magnets: Eight disc magnets and steel strike plates sit completely hidden beneath the interior liner paper, snapping the four walls to 90 degrees on contact so boutique staff and customers can fold the box flat repeatedly.
| Feature | Pre-Applied 3M Peel-and-Seal Tape | Concealed Reusable Corner Magnets |
|---|---|---|
| How corners lock | 4 pre-installed 3M 9448A double-sided tissue tape strips with oversized finger-pull silicone release tabs | 8 recessed neodymium disc magnets + mating steel strike discs embedded inside the gussets and walls |
| Bench setup speed | 5 to 8 seconds per box (peel 4 liners and press for 2 seconds) | 2 to 3 seconds per box (pull walls up and corners snap shut automatically) |
| Bond permanence | Permanent tamper-evident bond; behaves like a fixed set-up rigid box once sealed | Reversible; boutique staff or customers can collapse and re-erect the box 500+ times |
| Shear & drop strength | Highest structural shear lock for heavy payloads (3 to 7 lb) and parcel shipping | Strong everyday rigid hold for apparel, shoes, scarves, and boutique carry-home gifts |
| Relative unit cost | Standard baseline collapsible pricing | Modest premium for 8 additional corner magnet/steel components |

Know your size? Compare pricing across up to 3 quantities.
Request a Quote →How do separate drop-in EVA foam, molded pulp, and paperboard inserts work with collapsible boxes?
A frequent question from cosmetics, electronics, and corporate gifting teams is whether a collapsible rigid box can hold a precision die-cut cavity insert. The answer is yes, using a two-carton flat-packing workflow across our custom box inserts, custom eva foam inserts, and custom cardboard inserts options. Instead of gluing the insert into the box at the factory (which would prevent the walls from folding down), we pack your flat-folded boxes in Carton Stack A and your dense stacked or flat-die-cut inserts in Carton Stack B: Because both cartons travel in dense flat stacks on the pallet, you keep 70% to 80% of your freight savings while still delivering custom-contoured product protection inside the assembled rigid box
| Drop-in insert type | How it ships to your warehouse | Outer pad clearance & height rule | Best collapsible box pairing |
|---|---|---|---|
| Die-Cut EVA or EPE Foam Pad (Paper or Velvet Topped) | Stacked flat in dense master cartons (~40–60 pads per carton) | Cut (Usable L - 1.0 mm) × (Usable W - 1.0 mm) · Keep top 2–3 mm below wall height D | Corporate tumblers & tech kits, skincare bottles, influencer PR sets |
| Flat-Folding Die-Cut 20–24 pt Paperboard Divider | 100% flat die-cut sheets alongside flat boxes | Folds into interlocking cells or a raised neck platform in 8 seconds | Subscription boxes, candle duos, gourmet jars & chocolate gift hampers |
| Nested Smooth Molded Pulp / Thermoformed Tray | Taper-nested stacks (1.5°–3° draft angle) for compact cube | Drops straight onto assembled floor; locked corner gussets prevent upward lift | Sustainable beauty discovery kits, wellness rituals, ceramic tableware |
How do I prepare artwork and sign off on my collapsible rigid box dieline?
Once you understand the corner gusset and insert mechanics, review our companion guides on how to measure and choose grayboard for collapsible rigid boxes and collapsible rigid boxes vs setup magnetic and folding mailer boxes. When you request a quote on our custom foldable rigid boxes page, our prepress team delivers both your collapsible box CAD dieline and your drop-in insert dieline with zero die or plate charges. Check these five details before approving production
- Step 1: Confirm your usable Inside Length (L) is at least (2 × Inside Depth D) + 10 mm (+0.4 in) so the left and right walls fold flat with clean center clearance.
- Step 2: Extend exterior and interior background colors across all 15 to 18 mm turn-in margins plus 3 mm bleed so no white paper edge shows along the rim.
- Step 3: Specify matte, soft-touch, or gloss BOPP film lamination (or woven cloth) across both the outer jacket hinges and the interior 45-degree corner gussets.
- Step 4: Choose between permanent 3M peel-and-seal corner tape (with easy-pull finger tabs) or reusable concealed corner magnets, plus an optional front-flap ribbon pull tab.
- Step 5: Verify that any separate drop-in EVA foam or paperboard insert is sized -1.0 mm smaller than usable L × W so packers can drop it cleanly past the locked corner gussets.
What are the most common dieline, corner gusset, and insert mistakes on collapsible boxes?
Avoid these five structural prepress mistakes before releasing your collapsible rigid tooling
- Leaving zero gap along the 45-degree diagonal crease between the two triangular corner gusset boards, causing the rigid board edges to bind and tear the wrap.
- Printing dark flood ink on unlaminated paper across the diagonal corner gussets, creating white crease-cracking lines when folded 180 degrees flat.
- Gluing a deep 3D EVA foam insert permanently onto the floor at the factory, which blocks the side walls from folding down flat.
- Sizing a drop-in foam insert tight (+0.5 mm interference) instead of -1.0 mm slip-fit, making it catch against the folded corner gussets during bench packing.
- Placing small text or metallic foil badges directly across the 6 to 8 mm flexible spine hinges on the outer 4-panel jacket.
Packaging for this






Ready to order collapsible rigid boxes? Compare up to 3 quantities with a free 3D mockup.
Request a Quote →Questions about collapsible rigid boxes
How do the 45-degree origami corner gussets work on a collapsible rigid box?
Each of the four tray corners is built from two right-triangle grayboard pieces separated by a 4 to 6 mm flexible laminated diagonal crease. When you push the front and back walls down, those triangles fold inward at 45 degrees and pull the left and right walls flat onto the base floor.
Are the 45-degree corner gussets visible once the collapsible box is assembled?
On the outside of the box, the corners meet at a clean, flush 90-degree vertical seam that looks identical to a traditional rigid box. Inside the box, the folded triangular gussets lie flat and flush against the left and right interior side walls, blended smoothly by matching interior flood print.
Will the 3M corner adhesive strips lose tack if boxes sit flat in a 3PL warehouse for 6 months?
No. Genuine 3M double-sided tissue tape is protected by moisture-sealed silicone release liners until the moment of assembly, maintaining full peel and shear adhesion for 18 to 24 months in standard warehouse storage.
Can I add a satin ribbon tie or ribbon pull tab to a collapsible rigid box?
Yes! Both a short 25 mm grosgrain finger-pull tab on the lower edge of the magnetic front flap and full two-piece tie ribbons anchored into routered slots fold completely flat inside the master carton without adding stack height.
How does a drop-in EVA foam insert stay in place if it isn't glued at the factory?
Once the four side walls are locked upright at 90 degrees and the -1.0 mm precision-cut EVA foam pad drops onto the base floor, all four rigid walls surround the perimeter of the pad so it cannot shift horizontally. If desired, we can also pre-apply a single peel-and-stick 3M dot on the underside of the foam pad.
Still have a question? Ask a packaging specialist.
Request a Quote →Request your collapsible rigid boxes quote
Tell us your size and quantities, and one dedicated account manager prepares pricing for each tier.
- Free design & AI-to-print studio + 3D mockup
- No die or plate charges · 4–5 day rush available
- Free shipping to all 50 states
- 10% off your first order
We verified two-subassembly collapsible rigid CAD dielines, 4–6 mm 45-degree gusset hinge tolerances, 3M 9448A corner tape vs N42 corner magnet locking specs, and two-carton drop-in insert clearances against Paperboard Packaging Council (PPC) and TAPPI standards. A packaging specialist checked every specification. Spot something wrong? Tell us and we fix it.
Sources
What changed
- November 5, 2026: First published with 2-part collapsible CAD breakdown, 45° gusset lamination table, 3M vs magnetic corner comparison, and two-carton drop-in insert guide.
More guides
New packaging guides by email
Sizes, materials and design tips. Unsubscribe anytime.